Support | Ochatbot
Ochatbot – eCommerce Setting
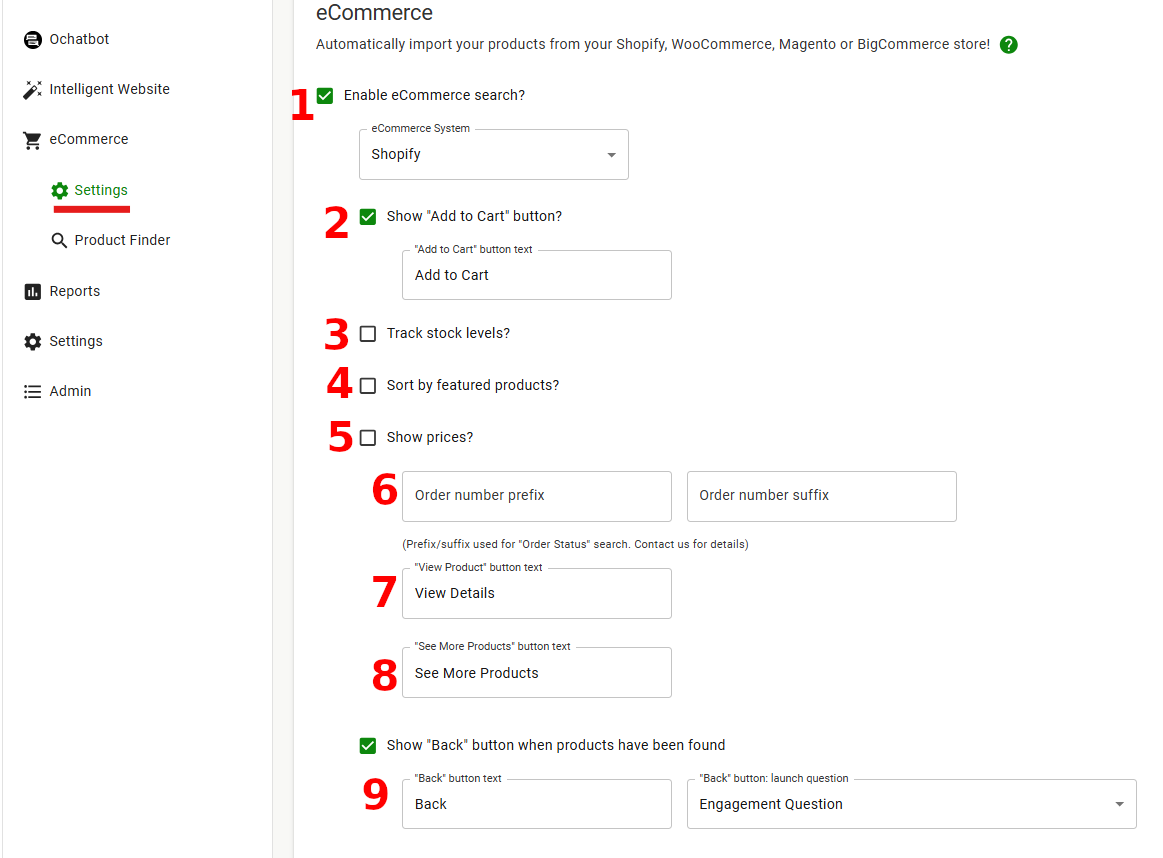
Ometrics customers that utilize Ochatbot for their eCommerce stores can use this tab to help them connect their product database. This allows users to quickly search for the right product they are looking for as well as add to their cart all right from the chatbot window. Let’s take a deeper look.

1. Enable eCommerce Search: Click this box to enable and disable eCommerce search, then choose your site platform from the dropdown.
2. Show “Add to Cart” Button: You have the option of including an “Add to Cart” button beneath product search results. You can modify the button with your preferred phrasing, such as “Add to Bag” or “Add to Shopping List”.
3. Track Stock Levels: Check this box if you’d like the AI to keep track of your in and out-of-stocks. When checked, there are four more options to select that control how the AI treats out-of-stock products: do not show “Add to Cart” button, show the “Add to Cart” button, hide the product from search results, or launch a lead form so users can contact you.
4. Sort by Featured Products: You can prioritize specific products in search results by using their specific tag. This lets you highlight items such as higher-priced or high-AOV products, sale items, or products with high or low stock levels. Make sure to enter the correct tag in the field to apply this sorting.
5. Show Prices: Click to enable product prices in the search results. Edit the price format with the currency symbol and currency symbol position. Important: Click the Show decimal in price box to prevent the AI from rounding prices, i.e., $18.99 becomes $19.
6. Order Status prefix/suffix: The prefix/suffix used for order status search.
7. View Product Button Text: Change what text is displayed on the View Product button.
8. See More Products Button Text: Change what text is displayed on the See More Products button. When clicked, the user is given more products to browse.
9. Show “Back” Button: After products have been displayed, include a “back” button at the bottom of the search results to direct the users back to the Engagement Question. Choose what the button text will say, as well as which question is launched once the button is clicked.

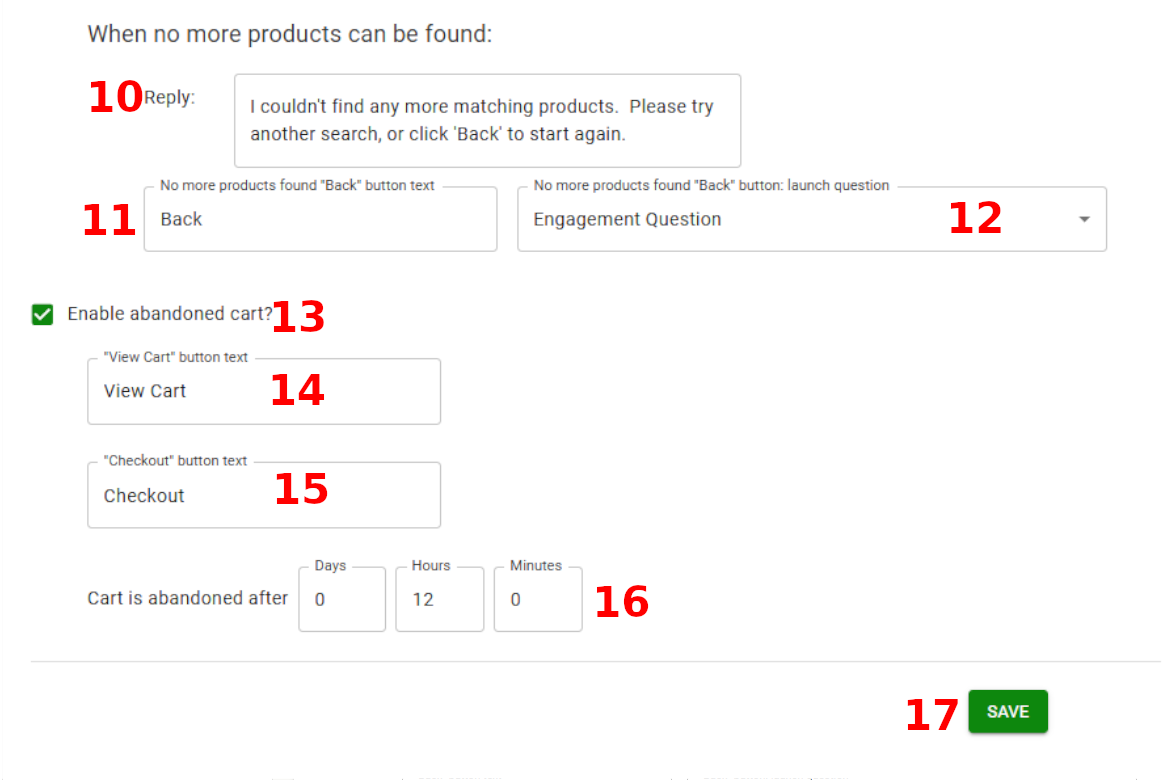
10. No More Products Can Be Found: Determine what text to display when the user reaches the end of search results.
11. No Products Found Back Button Text: Change the “Back” button text to your liking.
12. Back Button Launch Question: Choose which question is launched once theback button is clicked.
13. Enable Abandoned Cart?: Click the checkbox to enable the Abandoned Cart feature. A user lasts 30 days. Within that session, the AI will remind users of items left in their car and prompt them to check out.
14. View Cart Button Text: Enter the button text that will appear on your store’s cart link.
15. Checkout Button Text: Enter the button text that will appear on your store’s checkout link.
16. Cart is Abandoned After: Select the timeframe to trigger Abandoned Cart. The default is 12 hours. This means that when a customer adds items to their cart and then leaves your website, the chatbot will wait 12 hours before triggering the Abandoned Cart intent.
If the customer returns within a shorter period—such as 3, 5, or 8 hours—the Default Question will trigger instead, and the Abandoned Cart intent will not activate.
17. Make sure you click Save when you change these features. You should also perform a Scan to sync your data
Frequently Asked Questions
What if my store is on a platform that is not listed in the dropdown menu?
Simple reach out to Support and we will assist you in connecting your database.
We Are Here to Help
Here are the different ways you can contact support:
- When logged in, click the "Contact Support" button. Your information will be autopopulated so just type in your question or comment.
- To create a ticket when not logged in email: [email protected]
- Call us during business hours: 8 a.m.-5 p.m. MST 800-700-8077.
- If outside the US: send an email to [email protected] and we will set up a meeting over Zoom.