This video and transcription talks about how to build a chatbot using our free tool, Ochatbot™ .
First, you need to go to ometrics.com and click TRY IT FREE to open an account. Fill out the form, and you’ll receive an email prompting you to initiate the account. Once that’s done, you can log into your account and see your dashboard. The dashboard allows you to view all the tools you have built. Your active tools will show on the first page.
To see Ochatbot™ on your website, you need to add the code. Add your domain, then click “Get Code” in the upper right hand corner of the dashboard. Copy and paste this code into your website. Once this is done, you can start creating your chatbot.
Select “Create Tool” and choose “Ochatbot™” from the list of options. When you open up your chatbot, you’ll see an area which allows you to test the chatbot as you’re building it and a section for building your first question. The first thing you’re going to work on is your Default Question.
SETTING UP THE DEFAULT QUESTION
You can customize your Default Question to ask anything you want. For our example, we’ll walk through how to build a chatbot for a beer and coffee company.
Example Default Question:
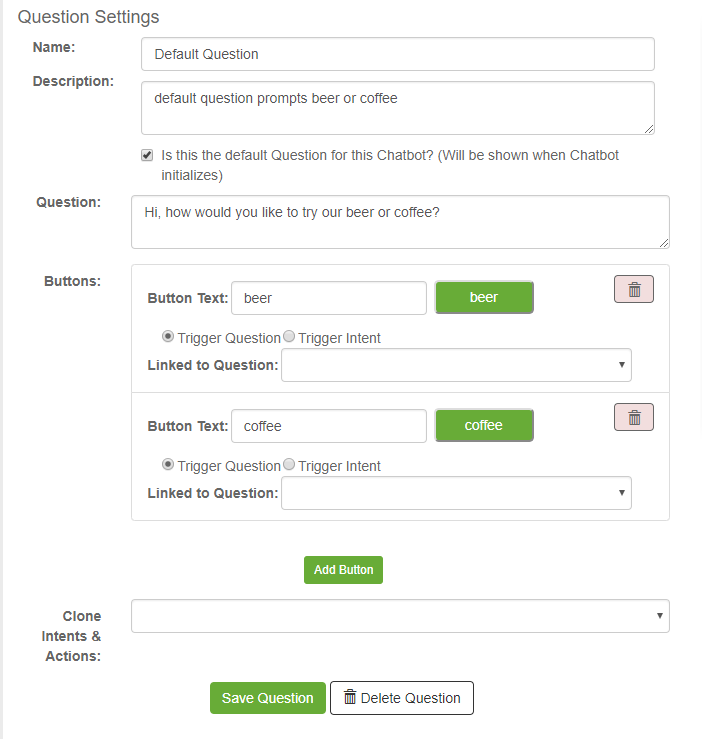
You can then add buttons which help guide the conversation and lead the customer to your products. For example, you can add buttons for “beer” and “coffee”. These buttons will trigger either a question or intent. If it links to a question, you have to create a new questions by clicking “New Question”. Intents are made inside questions at the bottom of the page by filling out the “Intent” section.
How do you know whether you need to make a question or intent? If you know you need to have more options (buttons) for an item once it’s clicked on, you should consider making a new question for it. This will help with organization. If clicking on a button leads to a single response with no further options, you can create an intent for it. More on this in a moment.
In our example, “beer” and “coffee” will both trigger questions. Be sure to save your default question before working on anything new, then click “New Question”. We’ll call this “talk.beer” and add buttons for light beer and dark beer.
Example Intent:
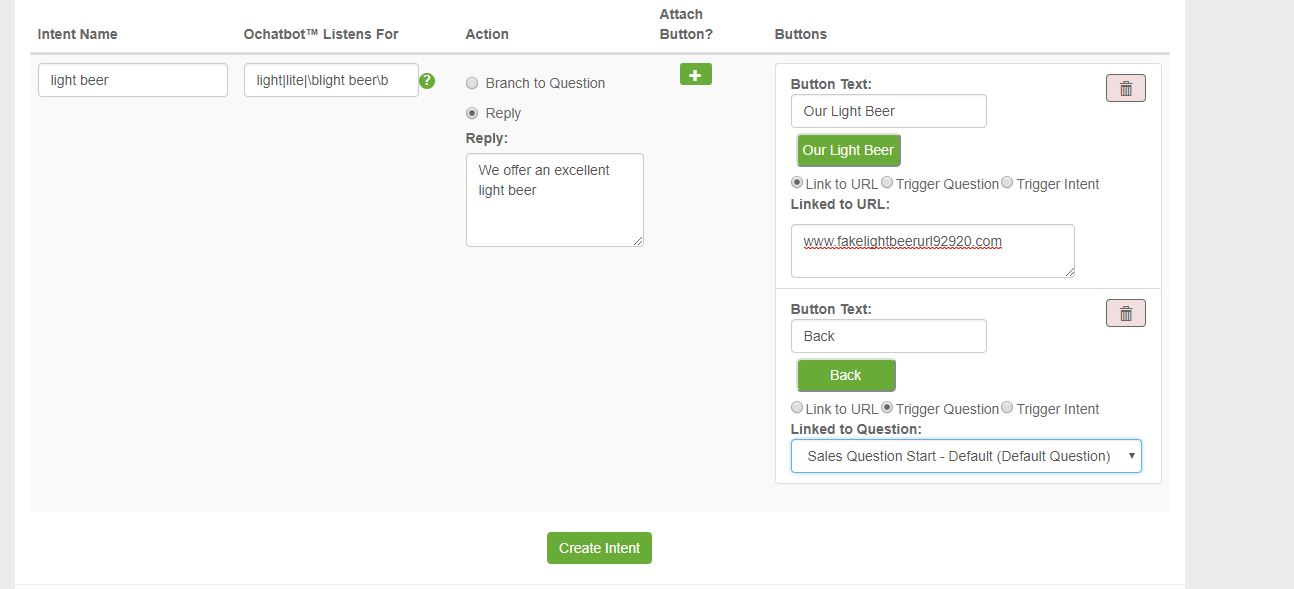
Again, save your question before beginning work on the next part. Now we are going to create an intent. Our first intent will be for light beer. First, we need to name the intent, ex. “talk.light-beer”. In the listeners section, you want to add examples of anyway you think customers might type the product in. For example, when looking for light beer, they might type light, lite, light beer, lite beer, etc. When typing in multiple listeners, you will need to use expressions to separate items. To separate items in a list, use a pipe ( | ). To make sure the intent is listening for an exact term, use \b etc. If you’re unsure what expression you need, you can always hover over the (?) icon next to the listeners box for a reminder.
Once you have the listeners, you can add an action (reply, reply with attachment, or branch to question). For our example, we’ll add a reply and a button that says “Back”. Once we add our button, we can set it to “branch to question” and point it right back to “talk.light-beer”. We can also add a button linking to our product page.
This process will be the same for dark beer and making a new question and set of intents for coffee. Once you have your intents built, you can edit them by clicking on the gear icon next to them. You can add images or video to intents (add action and select “reply with attachment”) at this stage. *If you want to add video/image to your intents while building, this can be done by selecting “Add Advanced Intent” instead of filling out the intent section.
Once you have your questions and intents built out, all you have to do is point the buttons in your default question to the beer and coffee questions by selecting “branch to question”.
What’s nice about organizing the questions and intents this way is that the conversation remains relevant. The conversation for beer will stay within the beer question, and the conversation for coffee will stay in the coffee question. Once a customer has clicked coffee, if they type “light” it won’t bring up light beer, it will only bring up light coffee.

Generative and Scripted AI to engage shoppers in conversational eCommerce.
Create happy customers while growing your business!
-
1 out of 4 shoppers make a purchase on average*
-
5% to 35% Increase in AOV*
-
25% to 45% Reduction in Support Tickets
WE GUARANTEE RESULTS!
SETTING UP GLOBAL INTENTS AND ASSISTANT
But what happens if a customer types something unrelated to beer or coffee? What if they ask about pizza?
If a customer types something Ochatbot™ hasn’t been told to listen for, it will trigger the fallback. The fallback response can be customized to direct customers to support and/or request the question be asked in another way. But if you want the chatbot to be able to answer questions about pizza, we need to create a Global Intent.
Global Intents listen for certain words any time during the conversation. Building a Global Intent is exactly the same as building an intent inside a question, just in a different tab. We can create a Global Intent called “talk.pizza” which listens for “pizza”. Now, if someone asks a question like “Is your beer good with pizza?”, the chatbot can answer “Yes, pizza goes well with our beer.”
*Global Intents can be reorganized by priority. Questions higher on the list will be listened for and answered before questions lower on the list. This way, a question listening for “high” can be answered before a question listening for only some of the letters, such as “hi”.
Another tool, the Assistant, is very similar to Global Intents. It’s a good tab to organize simple support questions, such as questions about return policies and warranties. It’s important to note, Assistant questions are listened for after Global Intents.
SETTING UP FORMS
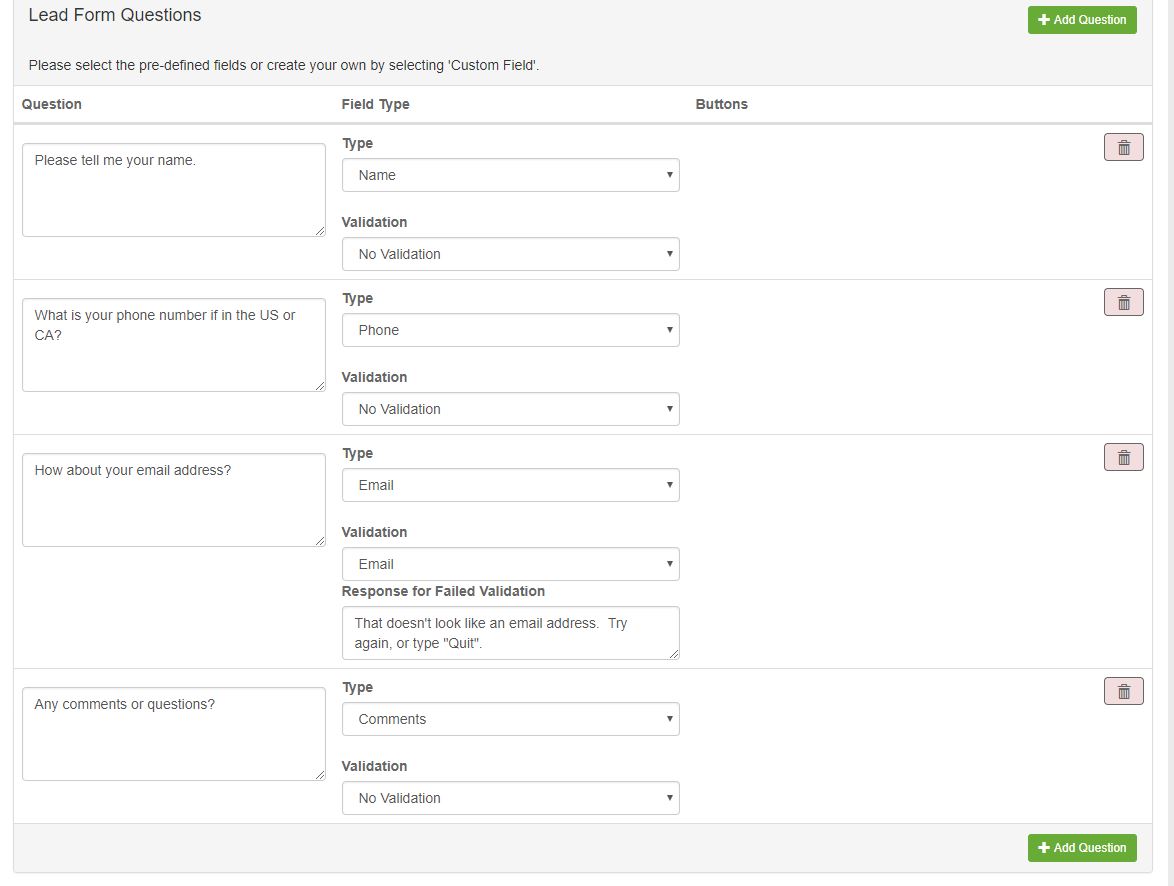
But let’s say someone wants to send you a message. To do this, we need to set up a lead form or survey. Surveys collect data and lead forms will send data wherever you want it sent. Under the “Lead Forms & Surveys” tab, we can create a lead form called “contact”. When you go to create a new form, you’ll notice many of the fields are pre-fabricated. All you have to do is edit the fields or add new ones as needed. By editing the form, you can make it more conversational. You can add additional fields if you have other questions you would like answered, comment fields, and even thank you messages. *You can use the “validation” option so the form requires complete information. For instance, an email will only be accepted in [email protected] form.
Example Form:
Zapier™ allows all of your form data to be sent to Salesforce, Mailchimp, or hundreds of other CRM apps. You can also specify an email address for all data to be sent to under “Alerts”. You can also link buttons in questions or intents to forms by selecting “trigger question” or even set the form as your default question at the bottom of the form page. Just as with the questions, be sure to save your form before working on something else.
For our example, we’ll return to the Questions page and add a question called “support.contact” triggers the form.

Settings: You can change how the chatbot appears. Under settings, you can modify the size of the chatbot as well as colors. You can also set/edit variables. Variables allow you to use an expression to represent a piece of information. When creating a response in a listener, you can type {{ email }} and it will automatically fill in the variable. *If you change your email address, all you have to do is change the variable value and all other instance will automatically update.
Triggers: You can set your chatbot to engage at the right time in the conversation or user experience. The chatbot can be set to engage when customers scroll down, to hide at certain times in the conversation, etc. *Triggers are different for mobile and desktop.
Targeting: You may not want your chatbot to appear on every page of your website, or you may want the chatbot to ask specific questions on specific pages. For instance, you can set the chatbot to ask/listen for different questions than on a particular product or service page. This can be set up under the Targeting tab.
Alerts: Any email alerts that are sent out will also show up under this tab.
Reporting: Ochatbot™ offers a number of different reports. The most important is the Fallback Report. This is going to tell you when someone hit the fallback, and then show you the thread of conversation that happened so you can understand how they were thinking, and how to fix the problem.
Reports are also provided for: Page Engagement, User Response Report, Surveys, and then of course the Lead Forms that are filled out. We put the data here as well as sending it to you.
HOW DO I GET HELP IF I NEED IT
While setting up your chatbot and other Ometrics® conversion optimization tools which are included with Ochatbot, if you ever have any questions, the Knowledge Base is provided to help you create your chatbot. There, you can find our FAQ, Billing Information, and articles on “Regular Expressions,” “Buttons,” “Variables” and much more. Also see our Complete Guide to Chatbots
We also offer chatbot development and consulting services if you need help.
You can also contact support by emailing us at [email protected].

- The Rise of Intelligent Websites - February 19, 2025
- Top Trending Products to Boost Your Shopify Store in 2024 - September 4, 2024
- AI Terms Glossary: Key AI Concepts You Should Know - August 22, 2024